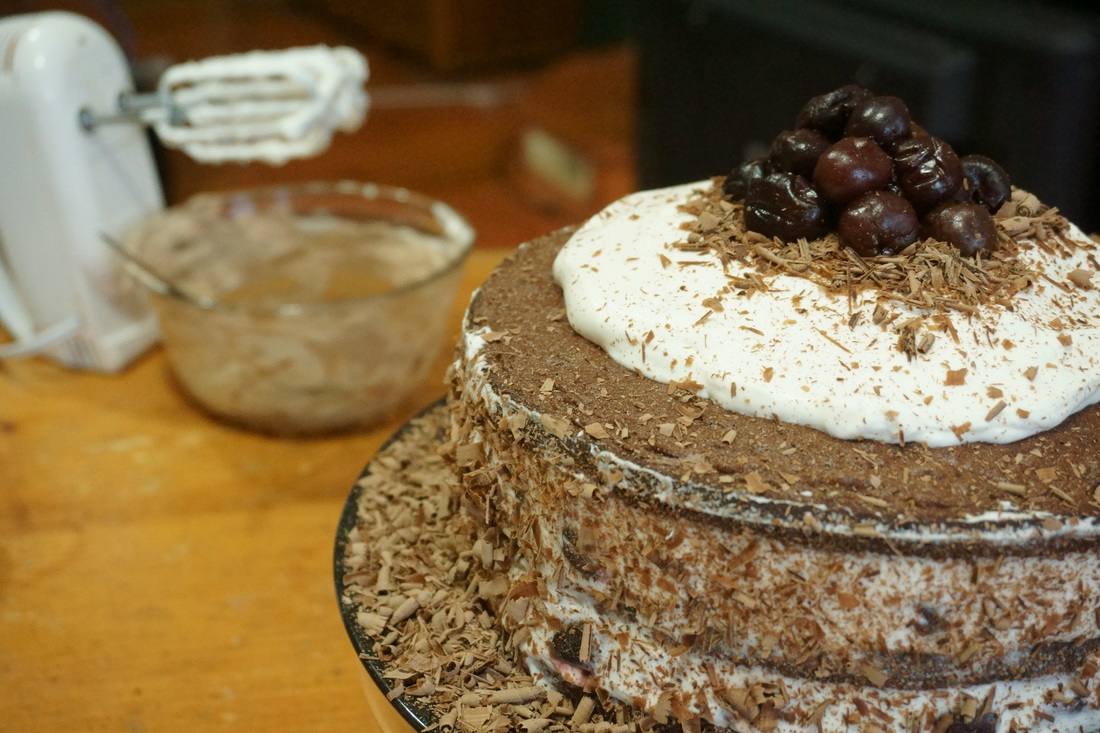
This recipe takes sometime to put together but the rewards are worth it. I and my family aren't big on whipped cream so this version is particularly good in my opinion because I've left the sides of the cake without whipped cream, however, you can easily spread whipped cream around the side of your cake if you prefer it that way! Cake 3 tbsp tapioca flour/starch 3 tbsp arrowroot powder/starch 2 1/2 tbsp sorghum flour 1 tbsp whey, soy, pea, or hemp protein isolate 1/2 cup + 1 tbsp dutch cocoa (or regular) 2/3 cup clarified butter 6 eggs, at room temperature 1 cup granulated sugar 1 tsp vanilla extract Syrup 2/3 cup Amoretti Premium Kirsch Syrup, this is a non-alcoholic version or 1/2 cup pure cherry juice + 1/3 cup sugar + 1 tsp imitation brandy extract Whip Cream Filling 2 cups heavy cream 1/4 cup granulated sugar Chocolate Whip Cream Filling 6 oz. bittersweet or semisweet chocolate, chopped 1/4 cup boiling water Cherry Filling Ingredients 10- to 12-oz. packages frozen cherries, preferably unsweetened, thaw and drain Garnish 8 oz, Chocolate shavings ♥ CAKE METHOD ♥ Have all ingredients at room temperature, about 70°F. Preheat the oven to 350°F. Grease and flour the bottom of three 8 x 2-inch round cake pans or one 8 x 2.5-inch cake pan lined with wax or parchment paper. Sift together 3 times flour and cocoa. Melt in a small saucepan clarified butter. Set aside butter. Whisk together in a large heatproof bowl: large eggs and sugar. Set the bowl in a skillet of barely simmering water and whisk constantly until the mixture is warm to the touch (about 110°F). Remove the bowl from the heat and beat on high speed until the mixture is lemony-coloured, has tripled in volume, and has reached the stage known as au ruban—like a continuous flat ribbon when dropped from a spoon (about 5 minutes in a heavy-duty mixer with the whisk attachment, 10-15 minutes with a hand-held mixer). In 3 additions, sift the flour mixture over the top and fold in very gently with a rubber spatula. Reheat the butter until it is hot and transfer to a medium bowl. Fold about 1 1/2 cups of the egg mixture into the butter until completely incorporated, along with vanilla. Scrape the mixture onto the remaining egg mixture and fold in. Scrape matter into the pan(s) and spread evenly. Bake until the cake begins to pull away from the sides of the pan(s) and top springs back with lightly pressed, about 15 minutes in 3 cake pans and 30 minutes all in one cake pan. Let cool in the pan(s) on a rack for 10 minutes. Slide a knife around the cake to detach it from the pan(s). Invert the cake(s) and remove the paper liner(s), if using. Let cool completely right side up on the rack. ♥ CUTTING CAKE INTO 3 LAYERS ♥ This step only applies if you didn't use three baking pans.
♥ MAKING CHERRY SYRUP ♥ This step only applies if you didn't use kirsch syrup. Bring to a boil 1/2 cup cherry juice and 1/3 sugar. Boil uncovered over medium heat for 5 minutes. Cool to lukewarm, add 1 tsp imitation brandy extract. ♥ APPLYING SYRUP ♥ Your cake should be completely cooled now, and if you used one pan you should have already cut it into 3 layers. Now moisten cake, using a brush generously coat one side of each cake layer with the cherry/kirsch syrup. Place one layer on your serving plate.
♥ FILLING CAKE ♥ Place the second layer of cake over the first, moist side down (facing chocolate cream). Press to level. Moisten the top of the second layer. Arrange a single layer of without packing them tightly, on top; you will have some cherries leftover. Spread about 2 cups of whipped cream over and between the cherries.
Place the last layer moist side down on top of the second layer. Press gently to level. Moisten top of layer with more cherry syrup. Top the black forest cake with any leftover whipped cream and/or cherries. Use a spatula to smooth whipped cream out on side of the cake. With the grated chocolate pat on the side of the cake and sprinkle the top of the cake. Refrigerate the cake for at least 12 hours, or up to 24 hours, before serving. |
Click here for the best available price for a Digital Measuring Cup/Scale on Amazon.
Affiliate Links Disclaimer Life After Gluten receives a small commission from the sales made through our affiliate links. However, I only promote affiliate products that are relevant to the articles that brought you here. The commissions received through your purchases help maintain this site. Thank you for your support!
Happy to meet you,
If you are that person with a million and one allergies and intolerance I am there to say you are not alone! Life After Gluten can be better than life with wheat. Living lactose-free since 2007 and gluten-free since 2013. Also intolerant and/or allergic to mushrooms, soy, and yeast. Categories
All
Archives
March 2024
Affiliate Links Disclaimer Life After Gluten receives a small commission from the sales made through our affiliate links. However, I only promote affiliate products that are relevant to the articles that brought you here. The commissions received through your purchases help maintain this site. Thank you for your support!
|
Photo from Brett Jordan


 RSS Feed
